 Quick Navigation
 All projects
  Hardware
 Links
Links Top projects
Alan numitron clock
Clapclap 2313/1386
SNES Pi Webserver
USB Volume/USB toys
Smokey amp
Laser cutter
WordClock
ardReveil v3
SNES Arcade cabinet
Game boy projects
cameleon
Home Presence Detector
 GitHub
AlanFromJapan
 Contact me
 Who's Alan?
Akizukidenshi
Elec-lab
Rand Nerd Tut
EEVblog
SpritesMods
AvrFreaks
Gameboy Dev
FLOZz' blog
Switch-science
Sparkfun
Suzusho
Datasheet Lib
Reddit Elec
Ermicro
Carnet du maker (fr)
snes pad usb adapter
Last update: Tue Feb 17 20:52:02 2026

This is just yet another implementation of that gentleman's work: http://www.raphnet.net/electronique/snes_nes_usb/index_en.php. Thank you Mr. Raphaël Assénat for sharing!
So basically I'll just reuse his work, but make a PCB for that. I'll try to do minimum code changes, none if possible.
Presentation
Principle
With V-USB emulate an USB controller from the SNES Joypad. Raphael's original work supports many different models of joypads (SNES, NES, ...) but I care only about SNES. I want also if possible to have this board reusable for other small USB projects so if possible it won't be an joypad emulator only. And I want to have a certain freedom to move pins around. And a slightly different more recent (= more easily sourceable) mCU.Points of interrest
Implementation
Bill of materials
Schematics
Source code
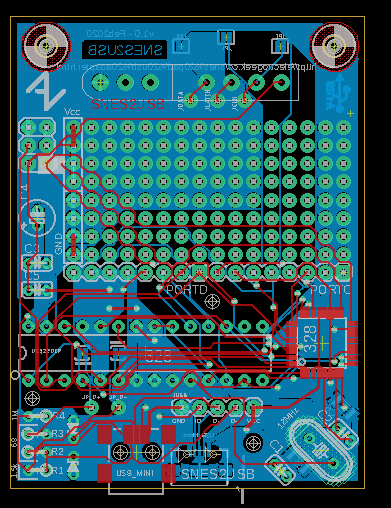
PCB versions
v1.0 [Feb2020]
How to use
Micro controller
ATmega328p is WAY overkill: the code is less than 4kB so feel free to replace it with an ATmega88p, it will still be more than enough. But again I choose to modernize the mCU (from Raphael's Atmega8) to source it more easily so do whatever you want. The board has plenty of free space, can be reused for more complex projects (NB: only port C and D are accessible, port B is not for board simplicity)Hardware
If you want to use the vanilla code (nes_snes_db9_usb.default.hex file), solder close the following SMD solder-jumpers:
Fuses
Then set the fuses (reminder it's an ATmega328p, 12MHz crystal)# Set the fuses avrdude -pm328p -cavrispmkII -u -Ulfuse:w:0xdf:m -Uhfuse:w:0xdb:m -Uefuse:w:0xfd:m
Code
Unfortunately the original code from Raphael does not work on my board. Something I must have done wrong, though I can't figure what. You can still find it in the originals/ folder of the code Git repo.So based on his code, I removed the things I don't need (Sega, DB9, SNES Mouse,...) and rebuilt it under Eclipse. A few code changes, because different compiler and because code moved from ATmega8a to ATmega328p. Long story short:
nes_snes_db9_usb.default.hex file# Upload the code avrdude -pm328p -cavrispmkII -Uflash:w:nes_snes_db9_usb.default.hex:a -v
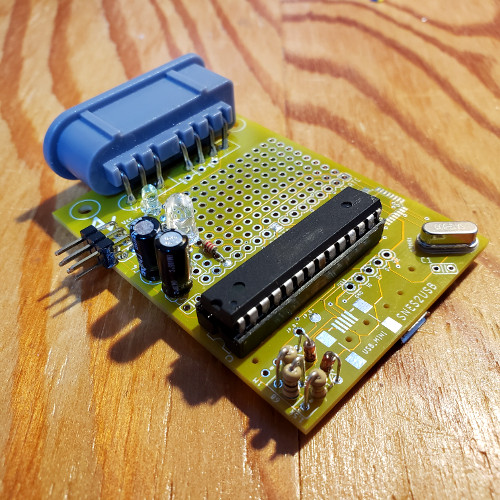
Pictures
Links
Helpful sources
Inspiration
electrogeek.tokyo ~ Formerly known as Kalshagar.wikispaces.com and electrogeek.cc (AlanFromJapan [2009 - 2026])